About Me
Hi. My name's Mark Hardiman. I'm an electrical engineer working in the South San Francisco Bay Area, and I graduated with a Master of Engineering (MEng) degree from UC Berkeley in 2015 and with a BS in EE from Texas A&M in 2014. My technical interests reside mostly around computer hardware and programming.
About this Website
This website's purpose is to detail personal projects of mine that I've undertaken since finishing school. Perhaps this will also serve as inspiration for projects of your own. Note: the site is not intended to provide complete instructions or implementation details. If you have a question regarding a project, feel free to email me at the address at the top of the page. Thanks for visiting!
Curious about my professional experience? View my LinkedIn.

Project 1 - Automatic Curtain
I'm a heavy sleeper. When my alarm goes off, it's often not enough to get me up. I want my curtains to open automatically when my alarm goes off to let in the light.
Project goal: develop a quiet, low-quiescent-power system to open and close curtains/blinds when an alarm in an Android app goes off.
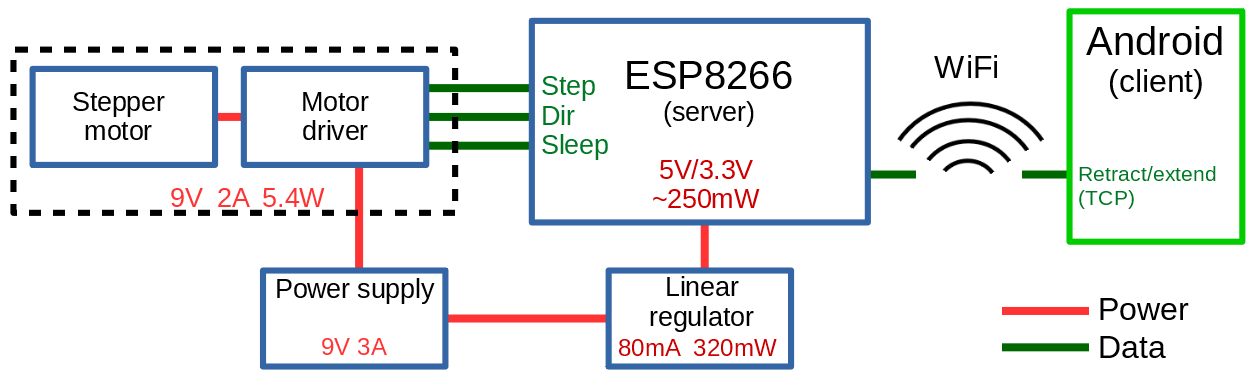
This project essentially brings IoT to your curtains, and for IoT to happen, we need a network-capable microcontroller to coordinate an Android app and a motor. Since the performance demands on this microcontroller are very small, I chose the ESP8266 for low cost and low power. Stepper motor selection, and thus motor driver selection, followed from a rough estimate of necessary torque as well as 100% margin for possible future additions and/or projects, coming to 20oz*in. A 9V, 3A power supply (plus a linear regulator) provides the system power for the estimated requirement of 2.3A at >8.5V. The system layout, including maximum power consumption and control signals, is shown below (warning: Firefox has display issues with these images):
Source code for the Android client is here and the ESP8266 server code may be found here.
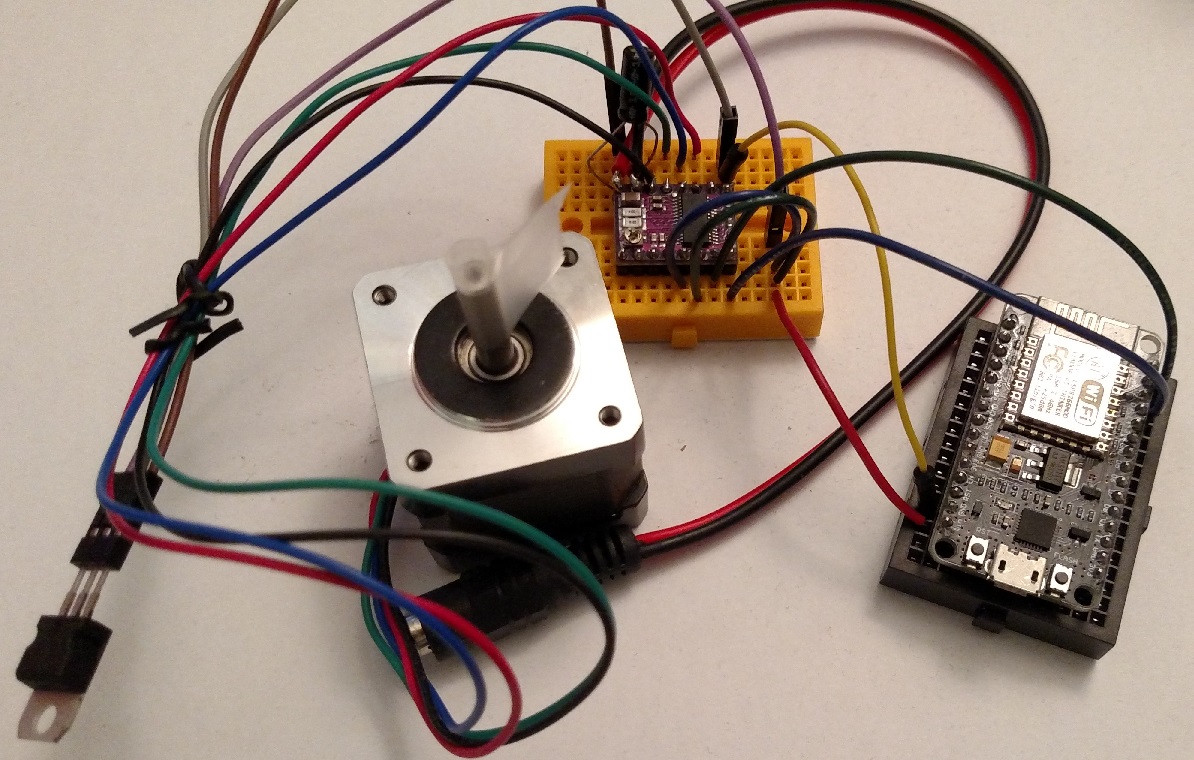
The bare hardware is shown below disconnected from the blinds:
I temporarily solved the problem of affixing the stepper motor to the curtain rod using rubber bands. I may return to this at a later date to make a more permanent mechanical solution (particularly if I buy a 3D printer).
Project 2 - LED Lamp
When an 8-year-old asks you for explosives for Christmas, you'd better figure out something else. Instead, I made this Minecraft-themed "TNT" block for my nephew.
Project goal: create a fun, safe, easy-to-use, low-power, aesthetic, portable, reliable LED lamp resembling the TNT block from Minecraft.
Fun: Add different lighting modes--flashing and constant.
Safe: Keep solder joints clean and well-separated. Ensure no heat build-up inside the lamp. Test.
Easy-to-use: Only two knobs required for operation.
Low-power: Use LEDs and a small microcontroller.
Aesthetic: Evenly diffuse the light and mimic the Minecraft block appearance.
Portable: 3D-printed, disassemble-able cube structure for easy packing (gift needed to be transported inter-continentally).
Reliable: Operate driver transistor in saturation for consistent collector-emitter current. Trade-off between number of resistors and interdependence of LEDs.
The most difficult aspect of the project--and my starting point--was the physical design. I needed to house electronics in a cube that was translucent, diffused light, colored red and white, and able to be disassembled. Due to the highly-customized requirements, I decided to learn to 3D model and print (huge thanks to Ryan Viernes for allowing me to use his 3D printer!). Below is an image of the 3D model I made in 123D Design.
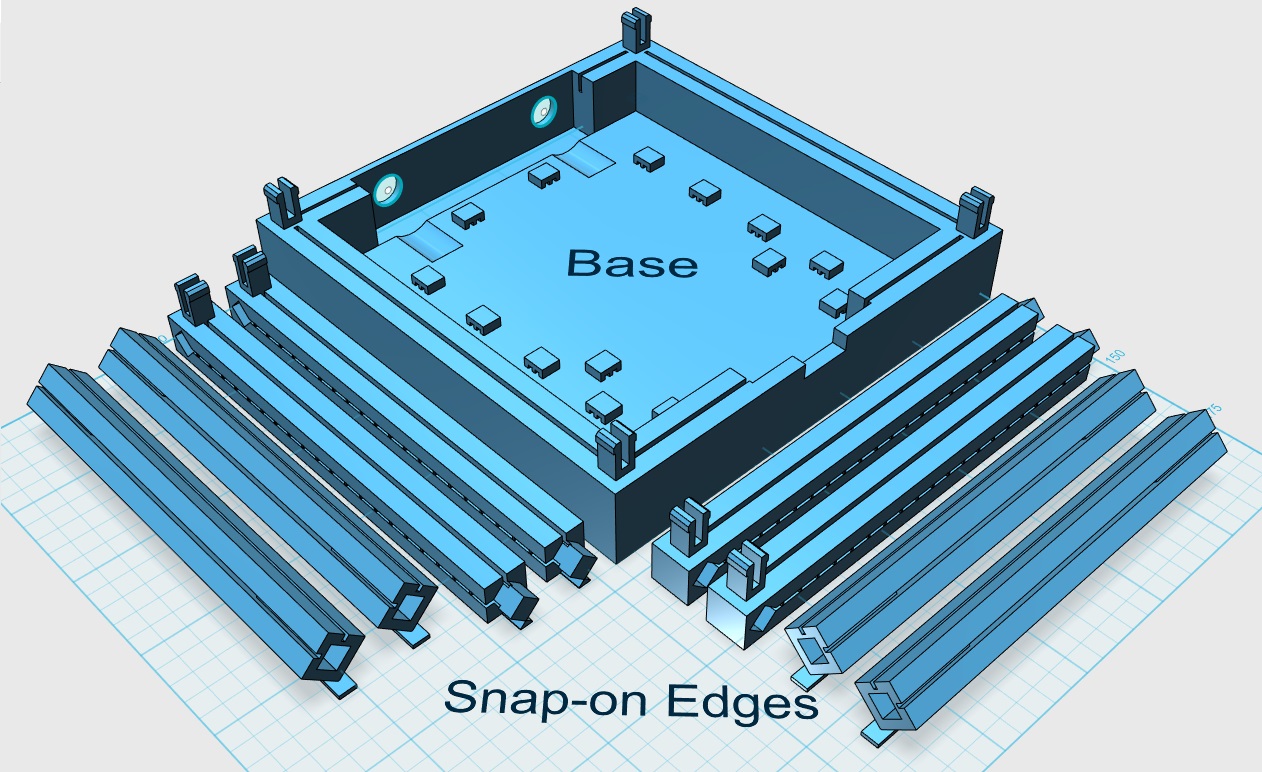
The model contains features to hold LEDs in place, position breadboards, affix potentiometers, pass the USB connector through, snap together edges to form a cube, hold plastic light-diffusing side-panels, and support the structure during 3D printing (model here).
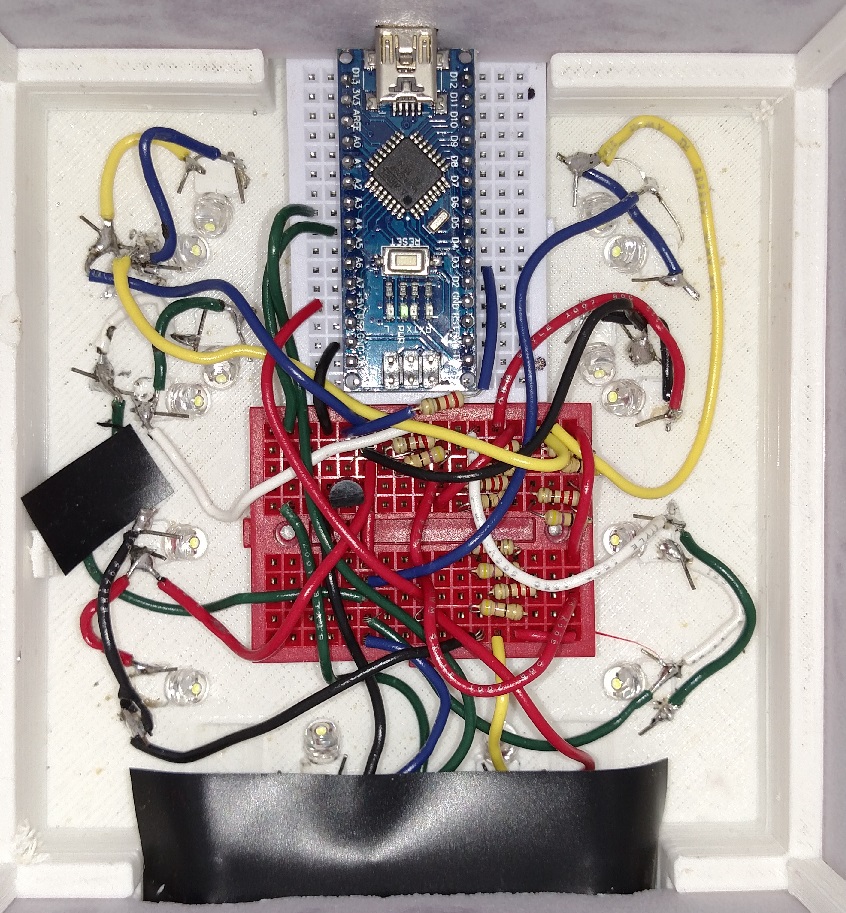
The user is provided two knobs--one for brightness, and the other for frequency. Brightness may be adjusted from zero to maximum safe LED output (~20mA per LED worth). Frequency varies from DC to 4Hz (no higher due to epilepsy concerns). The electronics provide control of the LEDs via two potentiometers the user can adjust, which are fed into the microcontroller's ADCs. Brightness and frequency are adjusted by varying a PWM output signal to the BJT driving the LEDs (code here). Note that stuttering between AC and DC states is prevented by applying hysteresis and smoothing to the frequency input potentiometer values. Resistor values were chosen to draw approximately 20mA per LED. LEDs were paired together to half the total number of resistors required. Groups of two were decided on as a tradeoff between total number of resistors vs. limiting damage of a single LED failure. A top-down view of the 3D-printed base housing the electrical components is shown below.
That completes the design. You can view a YouTube demonstration by clicking the image below:

Project 3 - Realtime Sound Effects with FPGA
This project is exiting the brainstorming phase and entering planning. This project's impetus is a desire to improve my Verilog skills for FPGA design and also learn a new bus protocol (likely SPI, maybe I2C). Throw in some DSP to learn, and we have ourselves a realtime voice effects platform. The block diagram will look something like this:
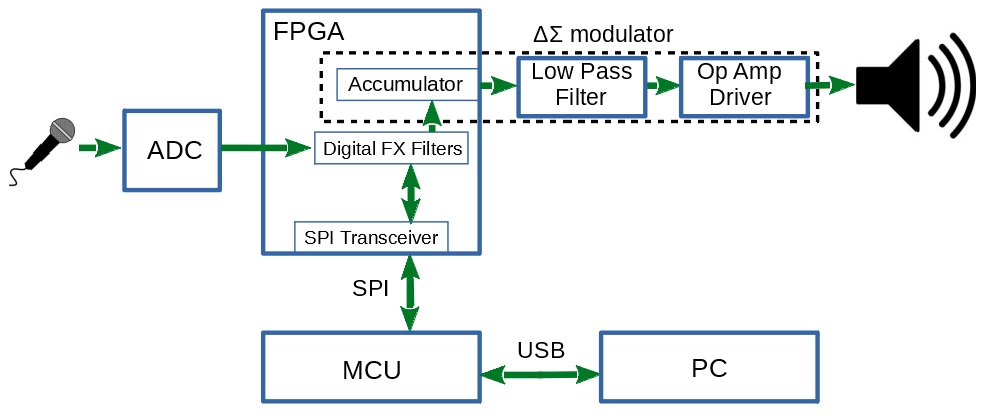
The FPGA provides the hardware acceleration for the DSP in order to provide realtime voice effects, such as tremelo, reverb, or even acting as a vocoder. Data regarding the detected pitch is sent through the MCU to the PC. Switching between sound effects may be performed through PC inputs. Many more microarchitectural details are required to further flesh out the subsystems.
Temporarily putting this project on hold. After implementing a pass-thru design (no DSP), I realized that the audio quality is low enough that the DSP effects aren't worthwhile yet. This poor quality is likely due to a number of issues, including a very cheap microphone and laptop speaker, quantization noise in the delta-sigma converter, and possibly leftover noise from the PWM that's not filtered out by the second-order analog low pass filter. I may return to this if I invest in higher-quality components and an oscilloscope to help with debug and noise quantification.
Project 4 - Reverse-engineering game physics with Python scripting
Video games involving battles between tanks have been around since 1974. More recent iterations involve 2D landscape, with players positioned on either side, competing to destroy each others' tanks by launching projectiles at certain elevations (i.e., angle above the horizon) and velocities. Getting a feel for the right elevation and velocity to land a shell on an enemy tank takes practice and is error-prone, especially when wind blows projectiles off course. These games are typically sequences of trial and error, as the players hone in their shots on the enemy's position. My intention was to remove the trial and error through scripting, so a player could land a hit every time--even on the first shot.

The first step was to understand the physics in the game, so that a script could model projectile behavior correctly. Through measurements of elevation, initial velocity, starting location (x,y), ending location, and duration of projectile flight (roughly timed via wall clock), I determined that the game used a constant-acceleration model for gravity, and no air resistance (thankfully). I fitted the basic kinematic equations to the game, and derived a constant to stand in for gravity. With the basic math understood, I implemented a Python script to take mouse input from a user to indicate firing location and target location, and then output all solutions to a quadratic equation in terms of firing elevation and initial velocity. The player could then manually dial in their ballistics settings provided by the script.
Testing was successful, at least initially. The first curve ball came when changing the game window resolution away from my native 1920x1080. This led to the shots missing completely, and obviously incorrect script calculations. The solution was to add hard-coded knowledge of the screen resolution into the script, and use that to convert between actual and simulated resolution so the physics constants could be kept the same.
The more serious challenge arrived once I enabled a new game setting: wind. In this tank game, wind applies a constant horizontal acceleration for the duration of projectile flight. As I knew was coming, my basic kinematics equations were suddenly wildly inaccurate. I needed a new model. Although I could write all the relevant equations, the true issue was solving them for the relevant variable. Essentially, I had f(x) = y, but needed f^-1(y) = x, but the math rendered this very difficult due to the appearance of the "x" variable in multiple powers. Rather than punch the equation into a web-based equation solver, I stubbornly looked for a solution I could implement myself. I figured that, although I couldn't compute the equation "backwards", I could compute it forwards, and find another equation to compute the error (i.e., how far off the projectile would land from target). This led to a "closed loop" solution of sorts, where the equation was iteratively computed forwards, and the error fed back into the equation as a corrective offset, until error was below some threshold value.
In the end, I showed off the script to some friends (letting on about its existence after landing some very suspicious but purposeful shots), and sent out a copy of the script to those who were interested (which also served to ease my conscience at cheating).
Script available on my Github.
Extras
This section includes some honorable mentions, as far as technical projects, and maybe some other fun stuff.
Honorable mention 1: C++ traffic simulator. The idea is to create a simple traffic simulation, so I can then tweak the parameters of human behavior and see how traffic changes--inspired by the cars I get stuck behind while commuting. It's my own C++ DLL built into a simple C# program for rendering. I hope to continue this project someday, but I've lost momentum for the time being. The image below shows the simulation configured with several lanes of cars, including a couple stoplights (red & green rectangles).

Honorable mention 2: Midi to wav C++ program. Converts midi files, along with audio samples, into a wav file. I used this to simulate a musical arrangement I created for a music box, using audio samples for each of the individual notes in a music box.
Code available on my Github, although be warned this was written to get a one-time job done, and isn't particularly user friendly.